Showing posts with label clothing. Show all posts

January 22, 2015

New Look 6587 and 1000 Shirtdresses of Autumn

So, I totally admire people who take the time to construct and sew an awesome collared, button down shirt.  There's many examples to oooh and aaah over, like Lauren at Lladybird (I want this shirt), Andrea at Four Square Walls or Mary at Fancy Idle.  Speaking of Mary, she is finishing up her 1000 Shirtdresses of Autumn and I declare myself a last minute arrival.  Well, kind of, sort of, maybe...?


You see, I am truly in awe of people who sew collars onto clothes (seems like a lot of work) but I HATE to wear them.  It's like this: my former roommate tells this story of how, when she was little, her grandma let her eat as much cottage cheese as she wanted- no limit.  So she did, she ate cottage cheese until she threw up cottage cheese.  That's pretty much my story with collared, button down anything.  I threw it up.


Ok, so not TECHNICALLY.  I just feel like I could've. I had to wear them as part of my uniform for school, then as part of my outfit while traveling with a performing arts group, then to look professional at my first job that required me to fill out a W-4...  I pretty much threw them up then gave them all away 10 years ago (although I admit to having 3 in my closet for those times I have job interviews or meetings with my boss).  


Even with my total and utter dislike of wearing them, I still wanted to participate in Mary's challenge.  I might have cheated...  I bought a pattern off Ebay that I thought I could dig, collar and all, but the seller couldn't find the pattern and returned my money.  After that I finally found New Look 6587.  It has 3 views with a collar (but a fake button placket, let's be clear about my laziness) OR 2 views without a collar. Yes!  I figured if the pattern itself has lots of options for the (kinda) traditional shirtdress, it counts- regardless of which view I make, right?

Ignore my horrible, crooked top-stitching.  It was late and I didn't care.

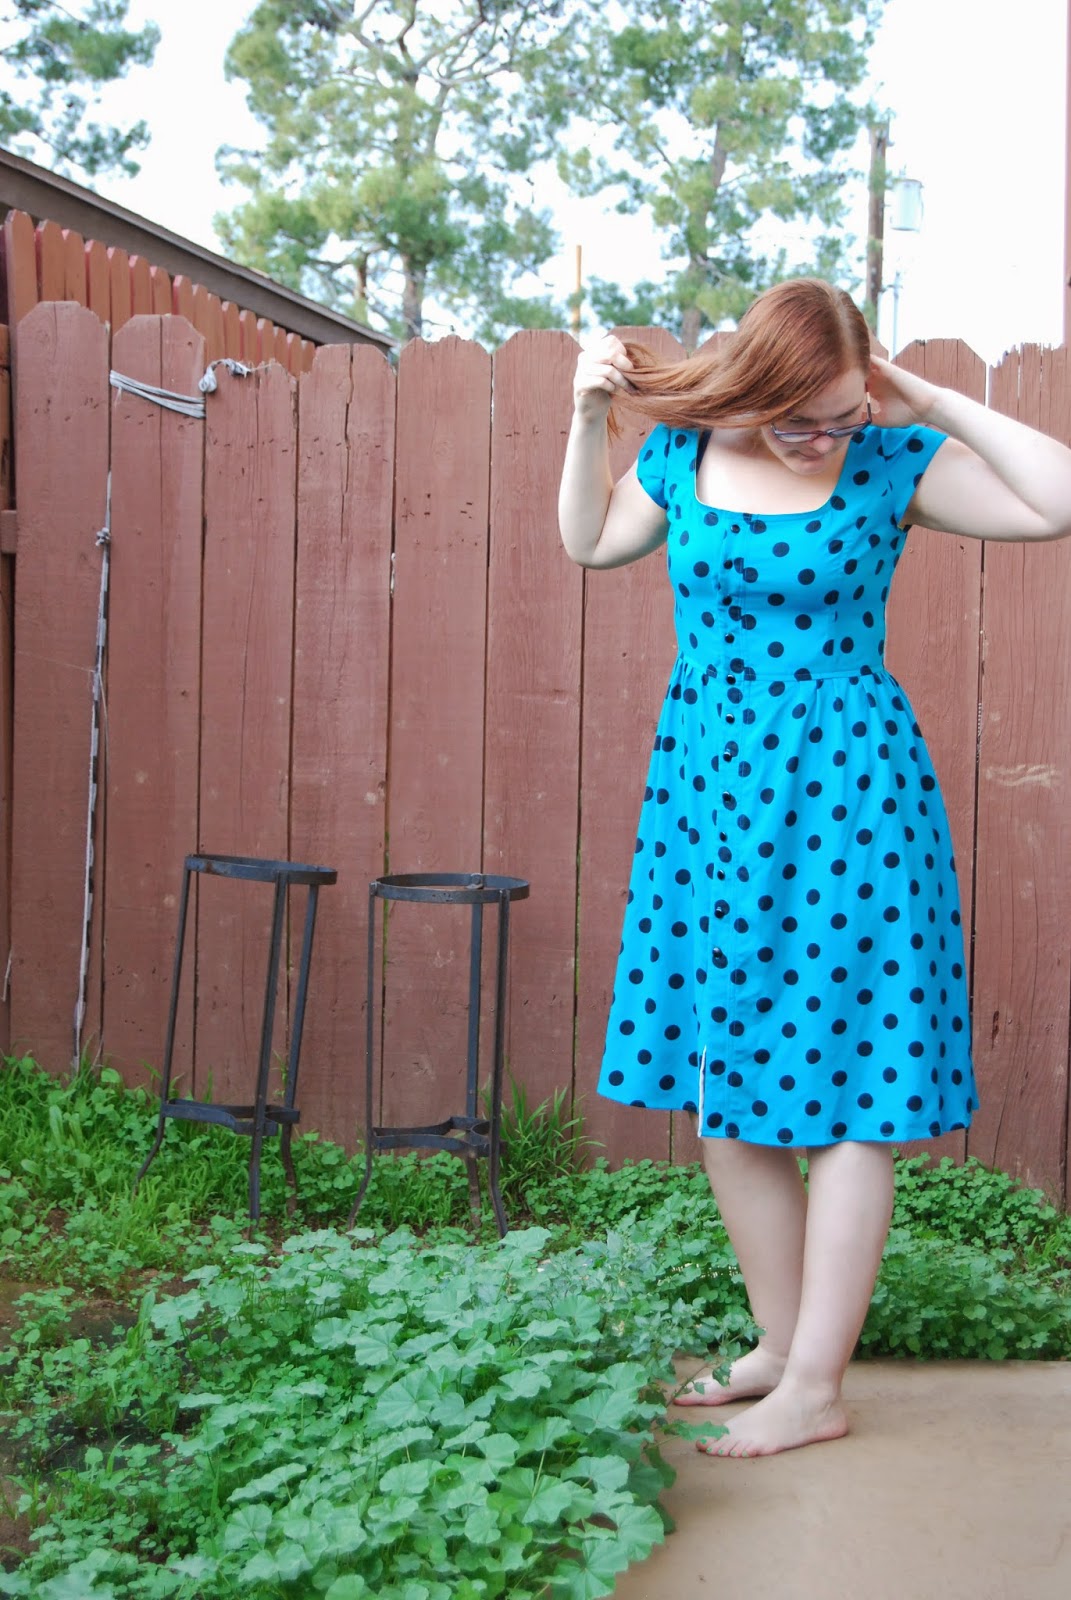
I made view E, minus the lasce-on-edges-thing.  I went with a straight size 12 but adjusted the seams to get a little room to eat.  Then I put my buttonholes on the wrong side- it's SUPER awkward (maybe just weird) having to think about how to button my dress when I put it on instead of just using muscle memory.  Fun stuff, huh?


The insides are all finished nicely.  The fabric is a rayon that wants to be lots of loose threads.  Seam finishing was a must and time consuming but I like how neat and enclosed all the seams are (but in my laziness you not only get blown-out, unedited pictures, you also get no inside pictures).


I wasn't sure what I was going to think of this dress when it was finished.  I kept trying it on after each new addition and felt like I had a Harry Potter robe on (I haven't even seen Harry Potter and I still felt that way).  I kept thinking I should shorten the length or what the heck am I doing sewing 12 buttonholes and buttons?  Wanna guess what my final reaction is?


I love it!

I love the slight 40's flare it has and how it twirls and hits my natural waist perfectly.  All the reviews I had read said this pattern had a short waist and many lengthened it.  I know my waist is short or high or whatever so after carefully measuring and looking at numbers, I decided to keep it like the pattern.  I'm glad I did.  And even tho I was unsure about the length (5" longer than most of my dresses), I like that too.


Somehow the neckline is too loose, but I didn't make ant size adjustments there.  I have no idea, it just seemed floppy and big and loose when I sewed the bias tape on.  Anyone know how to adjust necklines that are too big?  I like the fit every where else, but I'm at a loss as to how to fix the neck.


How about you?  Make (or do) anything lately that you were sure you wouldn't like only to really like the outcome after all?

October 31, 2014

My Halloween Horror Story

Hello all!  Happy Halloween to you, especially if you have your costume ready to go (bonus points if you're already wearing it).

I have a tale to tell you.  My favorite 6 and 4 year olds are coming to stay with me this weekend (and their mom).  They're my nieces and I'm especially excited that they'll be here instead of me driving there.  These particular nieces are particularly spoiled, especially by me.  I make their costumes for halloween each year.  And I let them choose what they want, so they tell me all year long what they want to be.  


I enjoy it, but we all know I have this laziness thing that I also enjoy.  So putting these two things together- costumes with a deadline and laziness- never turns out well (only for me tho!).  I thought I would share with you my awesome phone pics of their costumes from the last couple years as I proceed to procrastinate longer on finishing those costumes.  Oh, didn't I tell you?  It's Halloween and my nieces will be here in under 7 hours and their costumes are not finished.  In fact (might be TMI here) I just started them last night.  Yeah, I've had 3 hours of sleep.  Here's to hoping my current Halloween Horror doesn't end up full of blood and gore and stained/ruined costumes!  But on with the cuteness...


This cutie is my older niece who was sooooo into "Jake and the Neverland Pirates" two years ago that she wanted to be a pirate.  I painted the fabric for those pants myself cause I couldn't find anything I liked for pirate pants.  She was truly adorable (and still is).


This cherub is my younger niece who was soooo into princesses...  Wait, she never outgrew that, she's still soooo into princesses.  Anyway, with her older sis being a pirate, she had to keep up but also beat the game.  She wanted to be a princess pirate.  You guys, I had (have) no idea what the heck a princess pirate is!  I totally just made a costume full of pink but hopefully a little edgy-ish (for a toddler) and piratey.  


This is last year.  They were both super heros, but little niece had to up the ante again because she was not only a super hero, she was also a princess (again).  Ladies (and gentlemen?) I present to you The Flash and She-Ra!  


They're definitely off to save the world here, pretty sure that's why we're all still alive.  I mean, who could live without this kind of cuteness in their life?

THIS year, they've actually chosen completely unrelated costumes, which kind of makes me sad.  At first they wanted to be Elsa and Olaf from "Frozen" but let's be real- who wants to sew an Olaf costume?  I tried to be as non-encouraging as possible while encouraging the older niece to choose whoever she wanted to be (I rock this auntie stuff, right?).  Then they wanted to be Princess Peach and Mario from the Nintendo game Mario Bros.  I was all for that- how awesome are my nieces?  But alas, their final unrelated choices are Elsa for the younger and Captain America for the older.  Not complaining or anything but Elsa...


Yeah, every other little girl out there is going to be Elsa too.  Haha!  At least my niece's Elsa will be different than every other Elsa.  I mean, who doesn't take creative liberties when sewing children's costumes?  Or is that just my laziness speaking...?

What do you guys have planned for Halloween?  Any fun costumes?  And are they handmade or store-bought?

August 18, 2014

So This is Love


I made a shirt.  I'm pretty proud of the finished product too.  I really wanted a loose tunic to wear over yoga pants (for the days I don't want to shave and therefore I can't wear a skirt).  We just had a heat wave and hopefully it's the only one of the year.  But living here the last two summers I've noticed there's one heat wave that's two weeks long and it's always in August.


This heat wave was in July, and lasted maybe 10 days with a few rainy/muggy days thrown in.  Because this is different than what I've assumed is the norm, I'm preparing for the worst- another heat wave.  It's impossible to wear jeans in a heat wave, they get so heavy and hot.  Skirts are nice, but ya know, I hate shaving more than once a week (underarms are the exception!).  


The only problem with wearing yoga pants is I only have one shirt that is long or tunic length and cool enough for summer.  I have no problem showing my rear end most days (I have the best one in our family ;-) true story) but I prefer to wear looser, longer shirts with yoga pants unless I'm exercising.  


Since I had an obvious lack of shirts I deemed long enough, it just seemed appropriate to make one.  So I did!  Hehe.  I used Megan Nielsen's Crescent Blouse pattern with the curved hum tunic option.  I made it over three nights, maybe working on it a couple hours each night.  It was an easy sew, but there's a lot of ironing involved.  Because of the thin/flowy fabrics recommended for this pattern, there are no raw edges, which means either you're binding with bias tape or making french seams.  


The curved hem option wraps the back part around the front, making a cute little detail.  Ignore my facial expression here, I'm still getting used to using the timer on my camera.  That combined with the window to my right makes for some interesting photos.  


The above picture probably is the most accurate depiction of the actual color of my shirt.  It's a bright, springy green- it almost looks neon in the sunlight.  I got the fabric from Wal-Mart yeeeeears ago intending to use it as a lining for one of my nieces easter dresses.  I ended up making something different that didn't require a lining so it's been sitting in my stash for all those years.  I think it's a blend of some kind.  I say this because I used a higher heat setting instead of using the synthetic setting on my iron.  I was determined to get good creases.  I kept adjusting the heat higher and higher, testing a scrap of fabric and watching for melting.  It never happened, so while there maybe some polyester in this fabric, I'm convinced it must be a small amount.


I like the way it turned out, but there's definitely some things I would change next time I make this.  The pattern says the seam attaching the bottom pieces should be at your natural waist.  As you can see above, the seam is about an inch and a half to two inches below my waist.  I think I would raise that, but I would need to adjust the tunic pieces then because I wouldn't want to loose length.  In fact, I would like it longer!  Changing the neckline to be slightly lower is another thing I'm thinking about for next time.


Ooh! You guys!  I did my first baby hem.  The pattern says it's a rolled hem, and it's only 1/8 of an inch, but it still seems bigger than what I've always imagined a rolled hem to be.  But I'm so dang proud of myself for such a small hem on a curve.


I chose these metal buttons from my button collection.  I had three different buttons I was looking at, but these ones were pretty much perfect for the casual top I wanted this to be.  As you can see, I need to re-think where I start my top stitching to hide my (messy) backstitching better next time.  It's not too bad, but now I know under the button at the top of the strap would be better.


This is a much needed garment in my wardrobe.  Loose and cool and easy to wear.  And I love the shoulder cut-outs- you hardly feel the weight of the shirt the way they're placed and they're so cute!  I have to wear an undershirt because the material is so thin, but that's no biggy.  I actually wore this outfit to go run my errands.  It felt wonderful, letting the breeze in and feeling like I was wearing the least amount of clothing possible while still being decent.  Better yet, it doesn't even look like I'm wearing the least amount of clothes possible!  I seriously need to make another one, maybe the other tunic option this time...

August 8, 2014

The First Dress I Sewed (for myself)


A few months ago while I was doing laundry I came across the first garment I ever sewed for myself (because I had finally gotten to the bottom of the laundry pile).  As I was hanging this particular dress up I was picking apart all the mistakes I now know I had made.  I made this dress over three years ago but it was a UFO until after I moved to SoCal 2 years ago.  All I had left was a zipper and the hem but it took me about a year to get to it.  It was the first zipper I ever put in and you can definitely tell!  But let's start with the beginning of my tattle-telling.


I decided to use New Look 6886 and make a dress.  The style is very much something I'd wear as I'm a big fan of fitted bodices and flared skirts as a result of a mis-proportioned body.  I had already bought material for a different pattern (this was before my fabric addiction turned into a fabric stash) and I decided to switch patterns since they both called for the same amount of fabric.  No big deal there.  My first mistake came in looking at ( or not looking at) the measurements for the body.  I decided to sew a size 14 because that was my bust size and I knew the skirt was flared so I wasn't worried about my hip size.  I had read on many blogs about the ridiculous amount of ease in Big-4 patterns so I thought I'd be fine.  After I cut everything and had started sewing my bodice I freaked out.  I finally looked at the finished waist measurement and measured my waist over and over again, coming up inches short (or too much, your choice).  So... I decided to add 1 1/2 inch panels to the back of the bodice on either side and the same amount on each side seam of the skirt, thinking this would cover it.


Obviously I had no idea about how to adjust fit correctly (I don't actually know that I know now either) and this dress ended up being too big...  By almost exactly the amount I had added.  Funny, right?  I readjusted the back by the zipper, tightening it up to fit with pins.


I had also  decided to add a skirt lining, so I cut my lining using the skirt pattern and narrowing it's volume.  After that I added gathered tulle in an attempt to make the skirt poufier (oh the days that I always wore something poufy!).  That tulle got cut off after the first wash- it became a mess.


Because I decided to add a skirt lining I had no idea how to insert the zipper since a lining wasn't included in the directions.  I tried tho.  I pinned it in and sewed it up and...


I had a totally un-matching waist seam and one top of the back higher than the other.  Oh dear!


I folded the excess on top down, topstitched over it and cut out the excess- total chaos.


As a result of my incorrectly inserted zipper, the bottom of it had a funny hole and pucker.


The inside seams aren't finished but they haven't frayed terribly too much.


The shoulder straps are too long for my short shoulders.  I even ripped out the seam once to try and shorten them, but they're still too big and fall off my shoulders.


Actually, considering  how little I knew about adult clothing construction then and how fearlessly I went about it, it's not that bad.  Nowadays I make multiple muslins and hope my adjustments will work, but I'm not so fearless like that anymore.  I could definitely use that again, if anyone finds some you-don't-know-what-you're-getting-into-fearlessness lying around. 


I didn't wear this terribly often until recently since the shoulder straps fall off my shoulders and the skirt caught on the skirt lining and bunched up when I walked- it was sooooo annoying.  Here's some advice- don't use quilting cotton as a lining for quilting cotton.  It just doesn't work.


I recently decided to cut out the lining so it wouldn't be such a pain to wear.  It worked (happy dance).  The shoulder straps still fall down, but at least I don't have a bunching up skirt.  Since the most obvious mistakes are on the back I figure out of sight out of mind- right?  The best part was the first time I wore it after this adjustment I had two complete strangers compliment me on my dress, one even asked where I got it.  It kind of made my day.  I wear this dress more often now. I love how it's fitted just for ME and I wonder why I don't sew myself more clothes.


I learned so much from this dress, especially since all my sewing before this was children's clothing and home sewing.  Even with all my mistakes, I still feel good wearing it and have pride in it being me-made.  I've recently decided to use this pattern again, hopefully with different mistakes this time.  Hehe!  Also, my roommate would love for our living room to be completely pink like that (and I'm totally amused by the pink filter!).

July 31, 2014

Better Late than Never (Right?)!

Remember that dress I mentioned waaaaay back in April?  The bridesmaid one?  The bridesmaid dress for my friend that was seven months pregnant?  Well, three (almost four) months have passed now and 3(ish)+7=10 and guess what?  That sweet little girl is almost two months old now!  What does this mean for that dress?  That I never got over there to take pictures and the baby bump is gone so there's no point in trying to get them taken now.  I know, I REALLY need to work on my timing (but don't worry, my always-early-housemate is aware of this issue and I'm always reminding her we have seperate cars- hehe).

Anyway, I have a few pictures of my previously pregnant pal at the actual wedding I can share and some of the final muslin, but you'll just have to believe me about the nitty-gritty details.  Also- fair warning, this will probably be a wordy post.


So the pattern was New Look 6864.  The fabric was 100% polyester in Scarlett from Joann Fabrics, the main fabric was polyester satin and the overlay was a polyester chiffon.  I'll share my thoughts about polyester later in this post.

I started with a straight size 8 since my friend is normally a size 2 when not pregnant and I knew there'd be extra ease since New Look is part of Simplicity, a Big-4 company.  Well, that extra ease was not enough for mama and baby belly.  I measured how many inches I was short along the back where the zipper would be (and where the dress wouldn't close).  Taking those measurements, I added them to the given measurements for the size 8 and ended up all over the place.


The next muslin I decided bigger was better.  I cut a size 12 for the bodice, graded to a size 16 for the waistband and size 18 for the skirt, but I kept the length of all pattern pieces at the size 8 because that was the perfect length for her baby bump (does that make sense?).

This dress was way too big, but I was ok with that!  At that fitting, I pinned the back shut and all down the excess at the back of the skirt.  I pinned the extra on both side seams under her arms and it happened to line up perfectly at the bottom of the waist band so there was no need to grade down the skirt's side seam.  Now this part is real tricky- I took a Sharpie and marked along everything I had pinned- really hard, right?  At home I measured from marked line to seam line and marked that onto my pattern piece.  Because (pretty much every seam) had two Sharpie lines, one on each side seam/back zipper line, I ended up with two different measurements per pattern piece.  So I literally went in between the two marked lines and cut down the middle.

After cutting out my new pattern pieces I made my final muslin, but I was really hoping this would work so I took a chance and used some nice cotton- in hopes of this one being a wearable muslin.  It was, yay!  I only had enough of the cotton for the main dress, not for the the bodice lining.  I used a soft white cotton for the inside and decided to be persnickety with my thread.  The thread on the outside matched the main fabric while all the inside stitching on the white lining was also white.  Yeah, you see some pride sneaking out here.


Anyway, there was only one spot on the final muslin that needed adjusting, the upper right back bodice where it attaches to the neck band.  It was pretty easy to just adjust that by moving my seam line on the final garment.


Now, the final garment.  It. Was. A. Pain.  I don't like polyester, Sam I Am!   I do not like it in a boat, I do not like it with a moat or goat or a house or a mouse or on a train, plane, in the rain- however that is supposed to go.  Polyester does not press, like, at all.  Polyester satin and chiffon shift around sooooo much and be careful with your pins cause they leave marks.  Also, it doesn't press.  Did you know it's virtually impossible to get a decent crease or seam allowance to stay on whatever side you want it on because it doesn't press.  I'm pretty sure I had cartoon thunder clouds around my head from my frustration and growing irritation.


There's one part on the skirt where it's gathered and attached to the bodice that some of the skirt fabric got caught and stitched into the gathering.  It almost looks like a pleat.  I tried to unpick it so it could be redone nicer, but the fabric wouldn't cooperate and played hide and seek with my stitches- so a pleat added into the gathering it was!  I think (hope) I'm the only one who noticed.  I also decided to be lazy on the skirt overlay and not adjust the tension for the thinner, sheerer fabric.  The result was slight puckering that I hadn't even worried over until I saw the dress on my friend while standing up with the other bridesmaids (in their pucker-free J-Crew dresses).  Lesson learned I suppose.


 The chosen dress had a deep V/notch  in the neckline but because of the heavy. thick fabric, one side had a hard time staying up and not flopping down.  The solution to this became to sew the top of the V together to create a keyhole.  It was a nice detail that many ladies noticed and commented on (positively, I might add- hehe).  I've also come to discover that I cannot sew zippers that have been pinned into the dress.  None of my seam lines will match.  I HAVE to hand-baste my zippers in to get matching necklines and waist lines.  It's a pain while I'm doing it (unless it's embroidery, I'm not a fan of hand sewing) but totally worth it in the end.  One last thing- hook and eyes.  They are mischievous little notions.  Anyone have any tips for sewing them in easily or at least neatly?


All in all, it was a good experience and ended pretty well.  I didn't think I would do anything like that again anytime soon, but that was before I realized the difficulties I have saying "No freaking way!" to people.  Cuz, ya know, I totally made my roomie's Comic-Con costume.  But that's a story for another day.

May 5, 2014

It's a Celebration

Apparently starting a blog was not given a time slot in my calendar because it has not been happening.  I have been kept busy between sewing and work and occasionally sleeping.  Perhaps that's why I received an unfortunately timed cold early last week- one that is enjoying overstaying its welcome!  Today I'm rebelling against the over-abundance of cough drops I consumed all last week (to be able to continue sewing for the wedding that was yesterday) and am on a tea-drinking binge to soothe my exhausted and inflamed throat.  Thank goodness for being able to adjust my work schedule in times like this. 


My friend had her baby shower last weekend.  I love baby showers- all the adorable clothes, cute nursery decorations, enjoying friends company for the celebration, but mostly the anticipation of getting to meet the much-loved baby soon.  This little girl is already so special, it was wonderful being able to rejoice in this new life with her mama.


I knew I wanted to make the Noodlehead divided basket, so I bit the bullet and bought the pattern, not knowing if I'd have time to make it or not.  The night before the shower I decided to put wedding sewing on hold and make the basket.  I'm so glad I did, it's so cute and having made it once, I can only see it getting easier and easier (note: faster) to make.  The construction is genius and the finished product is so professional looking.  My only regret is I didn't follow the grain-line placement on the front pocket and it's quite obvious in the different direction the pattern on the fabric is going on that piece versus the handles and basket divider.  Lesson learned!


The morning of the shower I woke up and decided the baby and her older sister needed some matching clothes.  I only had an hour before I needed to leave to help set up, so I figured what's easier to make than circle skirts?  I used MADE's baby circle skirt pattern and her circle skirt tutorial for the skirts.  I wasn't about to hem circle skirts, even little ones, with my limited amount of time, so I chose the only color of bias tape that I had enough of for both skirts to finish the hems.  I think the result is pretty darn cute, and their mother loves them.  When I was at her house later that week, she was telling me that she almost cried at how little the baby's skirt is.  I think hormonal, pregnant women are adorable, seriously!  Obviously, I've never been through pregnancy myself, but I'm pretty sure I'll always find them adorable.


For the big sister's skirt I had to guess her waist measurement and I guessed slightly too big.  It's about two inches too big for her skinny body.  I haven't decided if I'm going to sew her a new one or put new elastic on the one already made.  Either way, I can't wait to see the sisters in their matching skirts!

Oh, I know I mentioned it at the beginning, but the wedding I was sewing stuff for happened and was beautiful and I am SO happy that my sewing-with-a-deadline is over.  I also finished the maternity bridesmaid dress (since it was for the same wedding) but have yet to get pictures of it (I was exhausted and sick and just didn't care at the time).  That'll have to be another time anyway, cause I need a new cup of tea.